Agency Manager
Go to Admin > Agency Manager. Only Admins can open it.
Agencies are never deleted, only deactivated. Deactivated agencies don't appear in agency dropdowns.
Agency list
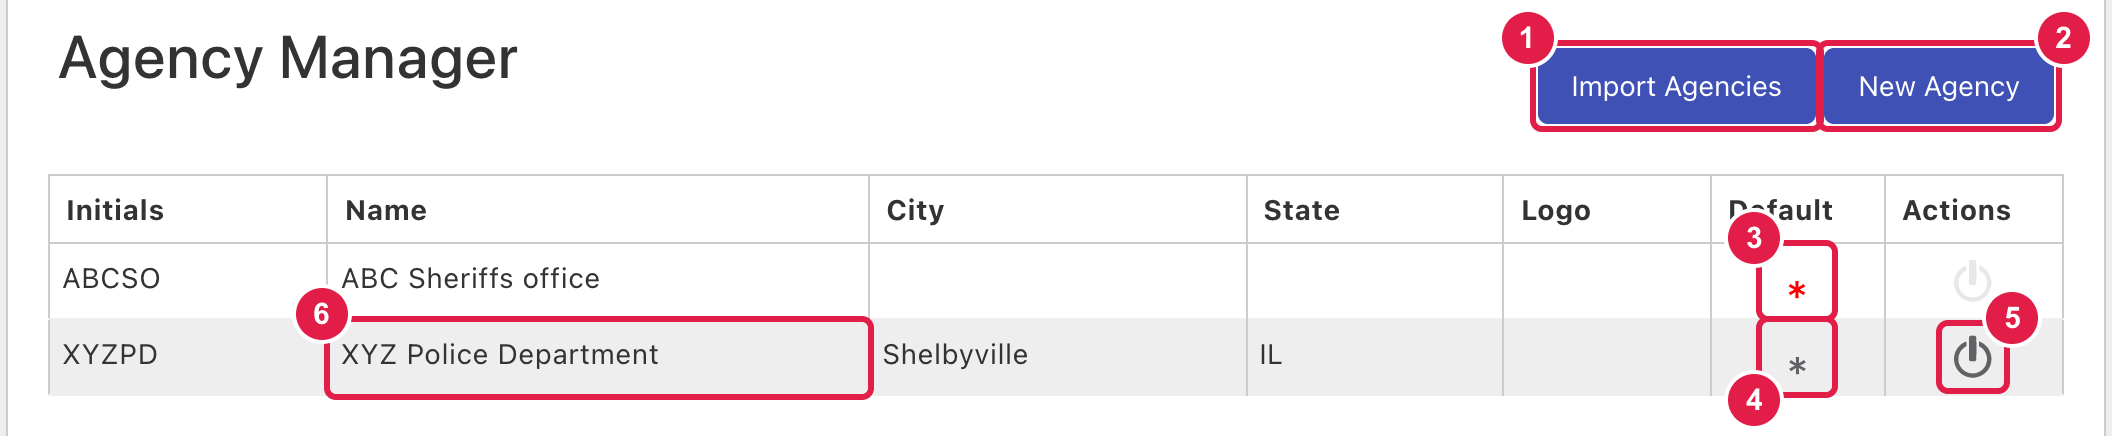
- Import Agencies: add or update many agencies from a CSV file (see Import agencies).
- New Agency: add one agency.
- The default agency, marked with a red *. Its name and logo show in the top navigation.
- Set as Default: hover a row and click the * to make that agency the default.
- Deactivate Agency or Reactivate Agency. The default agency can't be deactivated.
- Click a row to edit the agency.
Click a column heading to sort.
Add or edit an agency
- Click New Agency, or click an agency's row.
- Fill in the fields. Agency Name is required.
- Click Save (new agency) or Update (existing agency).
| Field | Notes |
|---|---|
| Is Default | Makes this the default agency. You can't turn it off; set another agency as default instead. |
| Agency Initials, Agency Name | Name is required. |
| Agency Email, Agency Phone, Agency Address, Agency City, Agency County, Agency State, Agency Zip | Optional contact details. |
| Current Logo / New Logo | Optional image. |
| Agency Active | Turn off to deactivate. The default agency can't be turned off. |
| Category | Only shown when agency categories are on. |
The edit form also shows how many users and cases belong to the agency.
Categories and the tree view
To group agencies into categories and subcategories:
- Go to
Admin>About / Settings. - Turn on Use Agency Categories.
- Optionally rename them with Agency Category Label and Agency Subcategory Label.
With categories on, the Agency Manager opens as a tree. View List and View Tree switch between the two views.
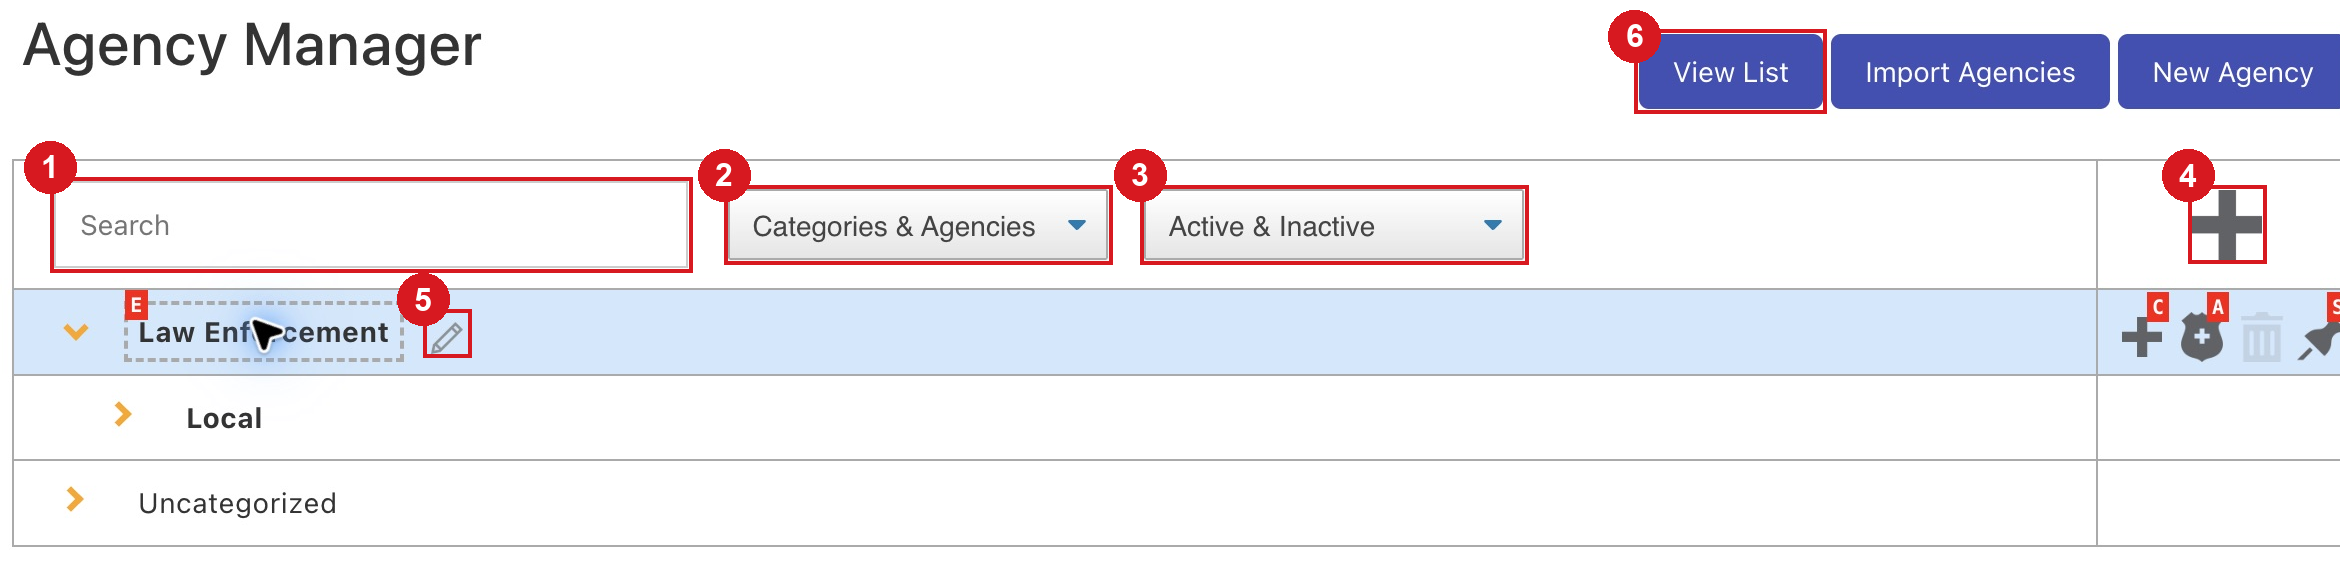
- Search finds categories and agencies.
- Choose whether to show categories with agencies or categories only.
- Filter active and inactive agencies.
- Add New Root Categories creates categories.
- Hover a category to reveal actions such as Edit Name.
- View List returns to the table.
In the tree view:
- Search filters categories and agencies.
- Filter by Categories & Agencies or Categories Only, and by Active & Inactive, Active Only or Inactive Only.
- Add New Root Categories (the + button): enter one category per line, then click Save.
- Hover a category for its actions:
- Edit Name
- Add Subcategory
- Add Agency: creates an agency in that category.
- Show Only This Category
- Delete Category: only for categories with no agencies.
- The categories above the default agency are bold and marked with a red *.
Import agencies
- Click Import Agencies.
- Step 1: click Download Template File and fill in one row per agency.
- Step 2: click Select File and choose the CSV.
- Step 3: review the rows and click Import. Failed rows are highlighted; hover one to see why, then click Retry or Close.
| Column | Notes |
|---|---|
title |
Required. Existing agencies are matched by title and updated. |
initials |
Required. |
category |
Optional. Separate levels with >, e.g. State > County. Needs Use Agency Categories. |
logo |
Optional. A JPEG or PNG, an image URL, or base64 image content. |
active |
true, 1 or yes for active; false, 0, no or empty for inactive. New agencies are active when the column is left out. |
- Other agency fields, such as
email,phone,addressandzip, can be added as columns. - For existing agencies, columns you leave out keep their current values.
- An import can't rename an agency or make it the default.
⌨️ Tip: Alt+A opens New Agency, Alt+I opens Import Agencies, Alt+V switches views and Alt+L jumps to the list. On a Mac, use Option.