Form Builder
You can access the form builder by going to the main menu > Admin > Form Builder.
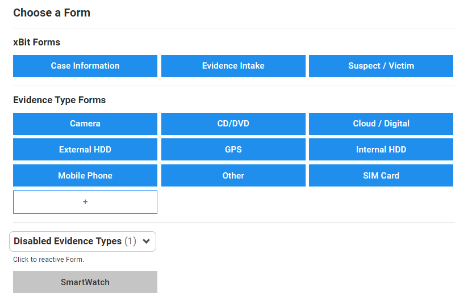
Here you first select the form you want to edit or create a new one. At the time of writing the xBit forms include the Case Information, Evidence Intake, and Suspect / Victim forms. If you don’t want to use a form, you can disable a form by clicking into a form and pressing the disable icon in the top right corner. Any disabled forms will be shown on the bottom of the form chooser you were just on and can be restored by clicking on them.
To edit a form, select any from the form chooser. To add a new evidence type form, click on the plus sign at the end of the list.
This powerful feature allows users to customize every data entry point within xBit! For example, if you need to change the name of a field from ‘’Subject” to “Suspect”, that is in your control.
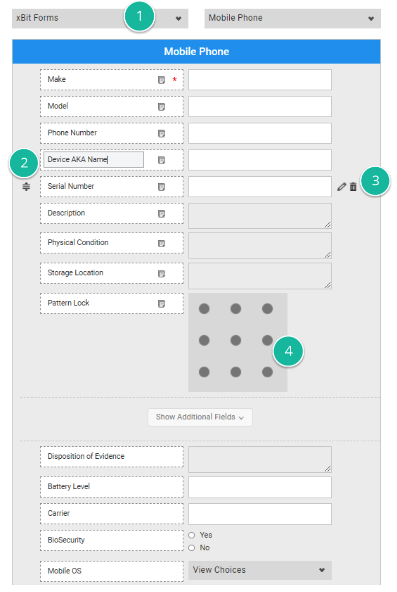
- Select a form on the top. They are divided between xBit core forms on the left used for case-level information and evidence forms on the right.
- On each field is a request submission icon and a required icon. Toggling the request submission icon will show the field on the request submission form. You can edit a field’s name my clicking on the label.
- To the right of each field you will see an edit and the delete icon. The edit icon will open the edit section which will be covered in the next section. The delete button will sometimes be disabled when the field is a core xBit field. On widgets it will be a disable button which will not remove it from the form builder but will hide the widget for the user.
- When hovering over a field you will see a position icon to the left. Dragging and dropping the icon will move the entire field above or below another field. Move fields below Show Additional Fields to hide them initially when creating new evidence.
Field Library
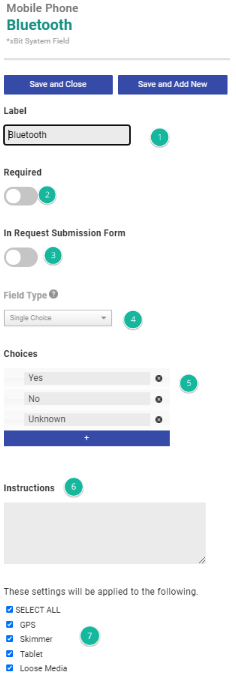
Clicking on the edit button for a field opens up the Field Details sidebar to the right.
- Set a label for the field
- Set whether the field is required when creating new evidence.
- Toggling the request submission icon will show the field on the request submission form.
- Set the Field type to short text, single choice, dropdown, long text, date, time, date and time, number, or pattern. The field type may be disabled if a field is a critical xBit System Field and cannot be changed.
- The choices option only appears when a field type of Single Choice or Dropdown are selected. Add, remove, or edit choices as you like. There may be instances when you cannot remove an option because it is a core xBit field or a core option specific to that field.
- Add any other details you want for a field in the instructions area. If this is filled out, you will see a question mark tooltip next to a field when adding, viewing, or editing forms.
- When making changes to a field that is shared with another form, you can choose if settings are applied to in other forms or just the form you are working on.
Adding New Fields
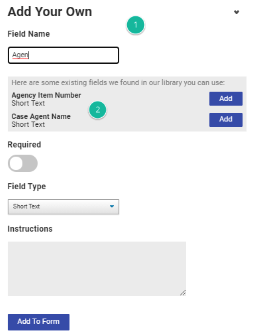
To add a new field, click on Add New Field on the top right or the purple plus button at the bottom of the form. You have the option to add your own field, add fields that are specific to xBit, or add fields that already exist.
- Add the name of your field
- As you type in the field name, suggestions will appear of fields that already exist. Adding these sections is similar to adding existing fields as seen below.
- Similar to editing a field, you can set a field as required, set the field type, and instructions. Choices will be set for Dropdowns and Single Choice Fields
- Submit when you are ready. It will appear in your form below the other fields but above the Show Additional Fields bar.
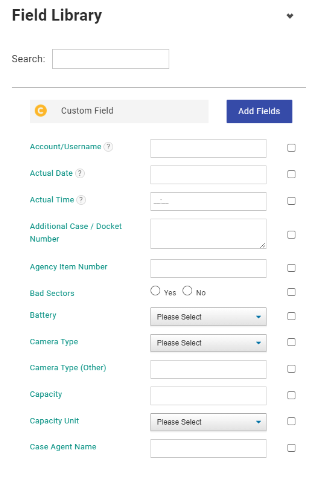
Adding Existing Fields
These fields include fields that were shipped with xBit as well as any fields that you created using the Add Your Own Field section.
Select the fields that you want to add and then click Add xBit System Fields. They will appear in your form below the other fields but above the Show Additional Fields bar.